Monday, March 18, 2013

Ask Sarah: Getting Urine and Stains Out of Carpet

First, I'd like to apologize for the absence of a post since last week! The Hubby and I celebrated ten years of marriage this past weekend and went on a romantic weekend vacation! We spent a lot of time on the central California coast and it was wonderful! So blogging took a vacation also. But I'm back! A little peek at this past weekend:


I was talking to my sister-in-law last night and she was telling me about Cutie A (my little niece) who fell asleep on their new carpet. Being recently potty trained, her little bladder couldn't keep things in and a little while later she had left a wet spot on brand new carpet. Oh, the frustration!!! I was silently rejoicing in the fact that I was past that point in my children's lives and that I no longer had to worry about pee stains on the carpet.

Well, as Karma would have it (and she always gets her way), my son wet his pants all over my car today. I wanted to go back to the beaches of California for a moment and forget that there was pee all over my clean, almost-brand-new car.

So I knew a post about urine removal was fate. I know....not very glamorous. But for those of you with pets and little kids (sometimes the similarities are uncanny) you share in the same occasional frustrations.

First things first: synthetic carpet cleaners aren't a good idea. Here's why: most are made with chemicals that initially clean the stain. But they also leave behind a film that over time has a tendency to attract more dirt. These cleaners also have powerful whitening agents in them that can, on occasion, lighten that spot of carpet. And now you have a mismatched mess! I've seen it firsthand. I still have a spot of carpet that feels stiff and looks a bit lighter than the rest. But it also seems to be a spot that attracts more dirt than most! It drives me nuts!

NEVER, EVER USE DISH SOAP. Or any soap. I know it's tempting...but don't give in.

If you absolutely have to use something store-bought, then buy ALL-NATURAL. But with a few simple ingredients from the kitchen cupboard, you shouldn't need to buy anything and your carpet will never be in danger of ruin.

All-Natural Carpet Cleaner

Four ingredients:

1. Baking Soda


2. White Vinegar


3. Hot water

4. Essential Oil of choice (optional, but great for needing a fresh smell)


First soak up the stain with a towel. Next, mix 2 cups of hot water to about 1 Tablespoon of white vinegar. Use a towel to dab the area with this mixture and clean up any additional urine. The hot water and vinegar should do a perfectly good job of getting the stain out. Next, dry the area as best you can with another towel.

Now go into the kitchen and break open a box of baking soda. Put it in a bowl. Drop about 4-5 drops of essential oil (I like Eucalyptus) into the baking soda. Mix the baking soda with the oil until it's all coated. Now go sprinkle it over the damp spot. The baking soda will begin to soak up the additional moisture and smell. Walk away for a couple hours and let it dry. You can just use baking soda if you'd prefer...it will still work. Be prepared for a slight sizzle...the baking soda and vinegar react but this reaction is not harmful to your carpet.

Now come back with your vacuum cleaner and vacuum up the dried baking soda! VOILA! Stain and smell gone!

I love this method of cleaning the carpet. It's not harmful to your carpet at all and works wonderfully! This will also work with dirt stains and vomit. Also take note that this can be used in the car, house, rugs, etc. Anything!

What's your favorite way to clean carpet stains?

Happy Cleaning!

The Queen

Monday, March 11, 2013

Ask Sarah: Organiziaton Basics and Lean Cleaning

Today I'm going to go over the basics of organization with a little thing we're going to call LEAN CLEANING.

The hubby works in an industry that has explored something called LEAN MANUFACTURING. Most often you'll hear it referred to as just "LEAN". He suggested to me one day that it would be perfect for the organization and cleaning of a house and I thought it was a brilliant idea!


Now, bear with me while I do some explaining. I promise you'll like this. "Lean" principles were derived from the Japanese manufacturing industry and made popular by Ford and Toyota (yes, the car companies).  In short, it's the process of continually eliminating waste, improving efficiency, and reducing costs. Wikipedia puts it perfectly: "Lean implementation is therefore focused on getting the right things to the right place at the right time in the right quantity to achieve perfect work flow, while minimizing waste and being flexible and able to change."

So what does this have to do with keeping your house organized? EVERYTHING! This system is a perfect way to put your house in order and I'm going to teach you how. Here we go.

To begin with, there are three steps we have to take before we start the whole LEAN CLEANING process.

  1. Design a simple manufacturing system: WE'RE GOING TO COME UP WITH A PLAN TO ORGANIZE THE HOUSE.
  2. Recognize that there is always room for improvement: THROUGH TRIAL AND ERROR WE'RE GOING TO REFINE OUR PLAN.
  3. Continuously improve the lean manufacturing system design: WE'RE GOING TO CONSTANTLY ADD IMPROVEMENTS TO KEEP THE PLAN WORKING AT OPTIMUM PERFORMANCE.
Too hard? I think not! And now to introduce the amazing LEAN CLEANING system!

Here are the basic steps to LEAN. This applies to anything that you use LEAN for. LEAN can be used for all sorts of things!

We use a 5-step process and they're simple! We'll refer to it as 5S. The system begins at the top and work in a continual cycle. Our handy "Queen of Tidy" shows us below how to be LEAN AND CLEAN!

Step 1: Sort
Step 2: Set in order
Step 3: Shine
Step 4: Standardize
Step 5: Sustain
 
 
Step 1: Sort, Step 2: Set in Order and Step 3: Shine
 
                 The reason we put steps 1 -3 together is because really they happen almost simultaneously. You'll see what I mean. Pick the area that you're going to organize or clean. And begin the sorting process. Let's use a kitchen drawer for example. The best way to do any sorting (and the way "lean" suggests) is to take everything out and only put back what we need and use. EMPTY IT OUT! Now, you're going to choose a way to set them in order that makes things simple to find and put back each time! It's also supposed to be set in order in a way that would make it easy for even a perfect stranger to know where things went. Every item has a place and only that item goes in that place.  And you would recognize when that item was missing. A silverware tray is a good example.


Now, of course, you would want to clean the drawer, and the tray, and the silverware if needed while putting it back. That's why these steps all happen at about the same time.
 
Step 4: Standardize and Step 5: Sustain


Standardizing means that we set an expectation for how it always should be, with room for change or improvement. And sustaining means that we work to keep the system running. Then we begin again with the cycle!
 
So, there it is in a nutshell. I could go into a lot of detail but wouldn't want to bore you!
 
This system applies to anything that you want to put in order, not just a kitchen drawer.
 
A quick word on organization...I love, love, love large Tupperware bins. So when you begin I always have three bins: one labeled KEEP, one labeled STORAGE, and one labeled DONATE. This keeps everything in order. And the STORAGE bin needs to be carefully checked and then reevaluated every so often. Sometimes storage is just an easy way of keeping things we don't need but are emotionally attached to. Take time to dig deep and explore why you're keeping it and figure out if you could be happy without it. You'd be surprised at what you can let go of. And you'd also be surprised at how "stuff" inhibits our ability to live life to its fullest. MATERIAL THINGS DON'T MAKE US HAPPY. Just a helpful hint!
 
Also, labeling is awesome! I've never purchased a labeler for fear that I'd have labels on things like the "light switch". I'm joking...sort of. But I do love adhesive, printable labels and use them for labeling. It helps me find things quickly.
 
What are your best organization tips and tricks? Lots more to come on organization in the months to come! This is just a good place to start!
 
Happy Organizing!
 
The Queen


Friday, March 8, 2013

Pinteresting Solutions: Cleaning a Ceiling Fan with a Pillowcase

Today we're going to explore this "Pinteresting Solution" that I've wanted to try for a while. The original post can be found here.  It suggests cleaning a fan blade with a pillowcase. You simply place the pillowcase over the fan blade and pull all the dust into the pillowcase as you pull it off. She supplied this fun visual aid below. Eek!


I've found myself looking at my fan so many times and thinking, "Look away and you won't notice!" But after a while I turn the fan on and small bits of dust start to fly all over. Then I can't ignore the madness anymore and have to get up on a ladder and clean them. This happened the other day and I knew I had to try this suggestion.

I got out an old pillowcase. Here's what happened:

1. You have to be completely careful about getting the pillowcase over the blade without pushing all the dust off the other way. I cinched it all up like you would your favorite pair of pantyhose (I know...you're thinking, "is she serious?!" Oxymoron of the century) and slid it all over the fan blade in one motion.

2. Then I kind of sat there because you're supposed to pull it all back into the case. But fan blades are wide and long and getting both sides and all the edges in one swoop is tricky! I ended up gripping it kind of like I would a Subway sandwich and pulled it all backwards.

3. The blade looked pretty good. But once wouldn't be sufficient, in my opinion.  It suggested to continue on to the next blade until you were done with the whole fan. But the pillowcase was all dirty inside and now you can't really cinch it up like you did the first time. I felt like I needed a separate pillowcase for every blade! And who has five old pillowcases just laying around?! Not me!

4. Obviously at this point you would need to shake the pillowcase outside and then take it through the washer.

All in all, I didn't care for this method of cleaning a fan. I usually get out my vacuum and set it on something high (like a chair) so it can reach the fan. Then I vacuum all around the edges with the hose and get any other loose dust. Then I take a warm washrag and wipe them down, rinsing the rag after each blade. This gives me a chance to wipe down all the other areas of the fan that get dusty too. Then I turn it on and let it dry for a while. While it's drying, I use the vacuum to go over the floor below that probably has a decent amount of dust on it now. If you're feeling ambitious, you can mop the floor too and you'll be LOVING your clean ceiling and floor!

HELPFUL TIP: For small fans that sit on tabletops or stand on floors, you can take them outside and spray them off with the hose...really. Let them sit all night in a dry, warm place (the garage would be fine) and they should be completely dry by the next day. Turn the fan over a couple times just to make sure all the areas of the fan are dry and it's ready to use. Trust me...this works!

What's your favorite way to clean a fan? Also, don't forget to submit your favorite spring cleaning tips and cleaning questions to me here.

Happy Cleaning and have a great weekend!

The Queen


Monday, March 4, 2013

Ask Sarah: Washing Sheets and Buying Pillows

Today on "Ask Sarah", we're going to be discussing bedding and pillows. The question I received over the weekend was,

"How often should I wash bedding and how often should I purchase new pillows?"

Great question. And one that is often overlooked. Yuck! Bedding gets far dirtier than we may realize and if not washed frequently can cause a host of problems from acne to allergies to spreading the flu. But no fear! Frequent washing can keep all those things at bay.

In my opinion, sheets should be washed weekly. Pick a day of the week that you have time set aside for washing sheets and strip the bed down to nothing. If you have several beds then you can do sheets all day or just do one bed per day. Whatever works for you. Now on to washing.  Never throw all of it in one load. You want room in the washer for those sheets to be rolled around with ease. The dirt and oils will be released much easier if you break up the load into at least two loads, possibly three depending on how much you have. I usually put the fitted sheet and flat sheet in together. I don't ever wash pillowcases or small items with the fitted sheet...they somehow seem to end up inside the fitted sheet and don't get washed or dried very well. Then I wash the pillowcases and my small throw blanket or some towels together. My bed spread is a thin, quilted, cotton so it fits nicely inside my washer. But if you have a large bedspread, don't attempt this. Take it to a Laundromat with a high capacity washer that will allow it to move in all that soap and water. There's nothing worse than pulling something out of your washer that was too big and now you have a huge soapy, wrinkled mess. Obviously sheets should be washed immediately if someone was sick or if there was a spill of some sort. Common sense goes a long way.

Bedspreads should be washed quarterly, more if you use it as a primary blanket at night.
Many people fold back their bedspreads at night and don't use them to keep warm. So obviously this would not require frequent washing. It does collect dust each day, though, and I would shake it out monthly or vacuum it off. I would wash your bedspread quarterly if you don't use it to keep warm at night.

I do use my bedspread every night to keep warm, so this requires more washing - every 1-2 months. I have a thin, quilted, cotton bedspread so it fits nicely inside my washer. ALWAYS wash your bedspread alone. If you have a large bedspread, don't attempt washing it at home. Take it to a Laundromat with a high-capacity washer that will allow it to move around in all that soap and water. There's nothing worse than pulling something out of your washer that was too big and now you have a huge soapy, wrinkled mess.

Wash sheets and pillowcases in Hot/Cold and Bedspreads in Warm/Cold
Washing sheets and pillowcases in hot/cold ensures that you've released all the oils and dirt. The only reason I wouldn't wash bedspreads in hot is because even just a little shrinking could mean that it doesn't fit your bed anymore. And this is so frustrating if it barely fit in the first place. Bedspreads are much more expensive to replace than sheets.

Buy new pillows every 1-2 years.

The link I suggest below over at http://cleanmyspace.com/clean-your-pillows/  suggests folding your pillows in half. If it bounces back, your pillow if fine. If it stays folded, you need a new one. I think this is a great idea.


Pillows are tricky business. They're so awkward to wash and never seem to be the same afterwards. I recently found a tutorial here on how to wash pillows. She suggests washing three times a year. I would suggest extreme detail when it comes to drying your pillows. You would never want mold or mildew to grow inside because they were not adequately dried. Be thorough! She has a YouTube tutorial also.

Other tips and tricks for cleaning the bed

1. Sprinkle baking soda over your mattress while your sheets wash. Let it sit for a while to soak up any unseen oils or odors. Get out your vacuum and suck up all the baking soda. Now your mattress is fresher and so is your vacuum.


2. Spray a homemade fabric freshener on your mattress and bedding. I like eucalyptus oil. Simply fill a spray bottle with water and add about 23-30 drops of any essential oil of your choice. Shake up the bottle and spray away. It leaves a nice scent without any harsh chemicals. Eucalyptus clears the sinuses which is why this scent it so beneficial on sheets...who doesn't' want to breathe easy while they sleep? It's also naturally antibacterial which is great for a place where allergens, mold, and dead skin cells lurk. You could also add some lavender oil which is calming to aid in sleeping. If you like Febreeze, this can also be sprayed on the mattress. Whatever you want!
3. White sheets are my favorite. They go with anything and can be bleached. Just personal preference, but take it from someone who has had everything from red to purple to blue sheets...white is AWESOME.

So, those are some of my favorite tips on cleaning the bed! Please feel free to contact me with any additional questions. Every Monday is "Ask Sarah" and you can submit your questions under the given email.

Coming Soon: Spring Cleaning Fan Favorites and LEAN CLEANING (You're gonna love this. Kudos to the Hubby in advance for the fantastic idea!)

Please submit your favorite spring cleaning tips and tricks! And become a follower! Please spread the word to your friends and family if you like what you're seeing!

Happy Cleaning!

The Queen


Friday, March 1, 2013

A New Blog Header and Pinteresting Solutions

Happy Friday, y'all! First of all, I'd like to proudly introduce my brand new blog header! Thanks to a very talented friend of mine, Spring, over at Spring Time Treats, I'm the proud owner of this adorable piece of art that now represents this blog! Please take a moment to go visit her website that's full of adorable stick figures, free pintables, fun games, and craft ideas. You can also visit her Etsy Shop for custom order family portraits and greeting cards. Thanks, Spring, for making clean look cute!

Now onto today's segment where I take a cleaning tip I found on Pinterest and put it to the test!

Pinteresting Solution: CLEANING A WINDOW WITH A DRYER SHEET

I had to give this one a try because I can't stand a dirty window for too long. In my house I have a set of double doors that lead out to the backyard and it's a fingerprint magnet. And when the sun shines on it just right, I often find myself trying to find a window in all the fingerprint (if you know what I mean). So today I decided to pull out a dryer sheet to see if any magic would happen.

While it did a good job of removing the prints, it also left behind a slight film and some small fibers. Dryer sheets right out of the box are polyester sheets often soaked in a softening agent. You can feel the "tackiness" on your fingers. So I ended up having to clean the window again anyway, I have not however tried a used dryer sheet, which was also suggested. I'll have to try that one later. While the softening agent will have been released from the sheet because of the heat of the dryer, small fibers will still remain and I don't think it gets the window as clean as it could be.

Here's some of my favorite products for cleaning a window:

1. White vinegar: You'd be shocked! And the smell doesn't last long.

2. Rubbing Alcohol: They make this in a Wintergreen Fresh scent so that it's more pleasant to smell.

3. Green Works Window Cleaner by Clorox: 95% naturally derived and smells great!

4. Newspaper: Leaves no streaks and can be thrown in the recycle bin afterwards!

5. Coffee Filters: Same as newspaper, only comes with the convenience of being bought in a nice, small package

6. Microfiber towels: Picks up dirt in amazing ways and can be washed again and again

But let's not throw the dryer sheet out onto the streets. Here are some of my favorite uses for the dryer sheet:

1. Sock/underwaer drawer refresher: Just put one of those babies in the bottom of your drawer and your socks will be doing a happy dance from smelling so fresh all the time!

2.  Car freshener: Put one under the driver and passenger seat in a small open Ziploc bag. Your car will smell wonderful. The reason for the Ziploc bag is to protect the carpet of your car on hot days. The heat will release the softening agents with the possibility of leaving a film on that single spot of your carpet. And although you may never see it, you might care someday!

3. Trash freshner: Next time you change the garbage, throw a dryer sheet in the bottom of the can before puting the bag back in.

4. Smelly Shoe Freshener: Take those bad boys off and throw a dryer sheet in each shoe. Let them sit overnight is a warm place and "Voila!". Much better!

5. Closet: Put one in your closet to keep clothes from smelling musty.

What are some of your favorite uses for a dryer sheet? How do you like to clean a window? Let me know!

So try one of these ideas this weekend and don't forget to post questions for Monday's post, "Ask Sarah".

Happy Cleaning!

Sarah

Monday, February 25, 2013

Ask Sarah: Food Storage

 
I hope you all had a nice weekend! Mine was full of busy, busy, busy!
 
This is my first Monday here on the blog and although I technically didn't really give anyone a chance to read this post today, it's better late than never. Life finally wound down for the day and I had a moment to sit and write. Ahhh....nothing better than climbing into bed. My feet are profusely thanking me for sitting down. The hubby and I just recently decided to paint the entire house this last weekend and it's definitely required a lot of standing. But things are coming along nicely and I hope that we're done in a couple weeks. Pictures to follow and a post on why I think painting every so often helps keep a house clean! But on to more important things...
 
Each Monday I'm going to do a segment called, "Ask Sarah" where I answer questions that were submitted over the weekend. We got a couple real great questions over the weekend and I've selected food storage for today. I must preface this Monday segment by stating that I am NOT an expert...just an enthusiast! So do whatever works for you! But here's what works for me.
 
Question from Gina: HOW DO I ROTATE MY FOOD STORAGE?
 
Excellent question, Gina! I think this is an obstacle for many people, including me! I have tried several things and after trial and error here's what works for me and what I eventually hope to achieve. Much of this is still "in progress".
 
1. Buy what you eat and get rid of what you don't. I just recently went through our food storage and got rid of so many things that we would never eat. Why in the world did I buy it then?! Because it was in sale...and that, in and of itself, my friends, can be a major trap!  There's no way you're going to effectively rotate things that you're not interested in eating. You have to clear out what you're not going to use before you can organize it to rotate. That said, when there's a good deal on food you'll eat, don't pass it up! (I was able to take what I wasn't using to a local homeless shelter. If the food is still good, look for things like this to still utilize perfectly good food.)
 
2. Make a menu. When you make your weekly / monthly menu, ALWAYS go to your food storage and look for ways to incorporate what you can. Start with those things that are expiring the soonest. Plan at least one meal a week around your food storage. Be creative!
 
3. Keep an inventory and store like items with like items. And I'm not talking about a yearly inventory. This one needs to be constantly in motion. When you take a can of green beans off the shelf, add a can or two of green beans to your shopping list. This has worked very well for me. I'm constantly replenishing what I use. Also, don't just throw everything on the shelf in a random order. You need to be able to SEE what you have. Store like items with like items so that they're easy to find: cake mixes all together, beans all together, corn all together, etc. You get the picture!
 
4. Find an effective storage method that allows oldest to be eaten first, and newest to be stored in the back. This can be hard depending on your available space and resources. I currently use some cabinets in my laundry room. But I always make sure that I scoot everything forward when I bring home something new. There are some amazing rotation systems out there, but they can be pricey. But brilliant people are out there right now coming up with ideas like the one below that I found on Pinterest. This was just recently added to the Hubby's Honey-Do List. He said, "No Problem". What a guy. And what a space saver! So organized! I love this! So be creative with your rotation system, but be persistent. There's nothing worse than throwing a ton out because you didn't rotate!
 

5. About every 6 months, reevaluate and purge if needed. I know how hard it is to throw out food that you bought, but sometimes you need to go through and make sure that there isn't a hazard like food poisoning waiting to happen. I remember opening a jar of spoiled mayonnaise and it was a good thing that it smelled awful or I never would have known! It would have been a horrible weekend if we had eaten it! So it's good to check in every so often and make sure that you're on the right track.

6. Don't forget long-term storage items. By this I mean that every so often, open a can of wheat (or whatever you want) and find ways to use it. Although these things will keep for 30+ years if stored properly, they're of no use to you if you haven't learned how to use them. Get creative!

There you have it! This is my preferred way of rotating my storage but do what works for you! What are some of your ideas for food storage rotation? I'd love to hear!

Pick one thing here to try this week, even if it's just organizing the pantry!

Happy rotating!

Sarah

Friday, February 22, 2013

Pintersting Solutions and the Daily Routine

I'm a self proclaimed Pinterest addict. I heard someone a while ago refer to it as "digital hoarding". I'd say that's pretty much true...and I don't care. Pinterest is such a wealth of knowledge and fun ideas! And when it comes to cleaning and organization, Pinterest is literally PLASTERED with an idea or solution for everything.

As you Pinterest fans know, some things work and some things don't. Plain and simple. So every Friday here on "Queen of Tidy", I will pick a cleaning or organization tip that I saw and put it to the test. Then comes the review. Feel free to leave your own experiences in the comment section and let us know how your "Pinteresting Solutions" are coming!

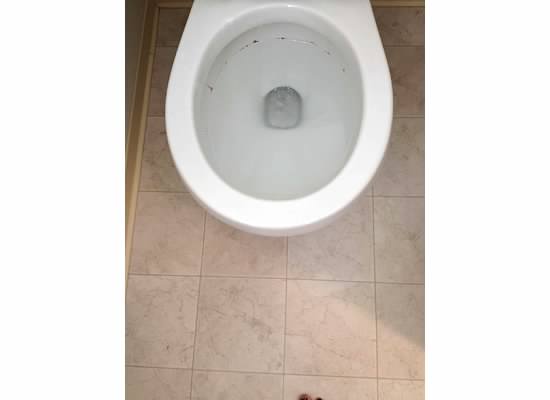
TODAY'S TEST: CLEANING A TOILET WITH VINEGAR AND BAKING SODA

The post suggests using 2 cups of vinegar poured into the bowl of the toilet, followed by sprinkling 2 TBSP of baking soda on top. Then let it sit and watch your stains disappear.

We'll see...

Here's my toilet before:

Here's the volcanic science project in progress:


Here's 15 minutes later:


Well, I didn't see my stains magically disappear. That said, I don't consider this experiment a failure. I'm a huge fan of vinegar and baking soda. They're both powerful cleaning products that are natural and safe for the environment and my little ones. I pulled out the toilet brush and cleaned as normal. I'll tell you what, though...the stains and germs didn't even put up a fight! The vinegar and baking soda did a great job of loosening things up and my porcelain throne looks amazing. So go ahead and pull out the toilet brush and just swish all that natural magic around! Your toilet is as good as new and you already had what you needed hanging around in the kitchen. Your pocket book will thank you (vinegar and baking soda = dirt cheap) and Mother Nature will thank you too!

The second part to this post will get you familiar with how I work each day to keep this circus in motion.

I thrive on routine. It keeps me sane. And everyday I have a small list of things that I do to keep the house in semi-order. I promise if you pick just a couple to start implementing, that things will seem a little more orderly. This is done once in the morning and once at night. My mom always said: WAKE YOUR HOUSE UP EVERY MORNING and PUT IT TO BED EVERY NIGHT. I've found this to be true. Start and end the day with order. So here it goes:

1. Make the beds (This obviously doesn't need to be done at night)
2. Open all the blinds (Close them up at night)
3. Empty and load the dishwasher (No dishes in the sink..EVER. Clean up after each meal. Start it before bed so that you wake up to clean dishes)
4. Sweep the floor and quick vacuum if needed (I do this after each meal.)
5. Start and fold a load of laundry (This includes putting them away!)
6. Quick walk through of all rooms (Just tidy up a bit...fold that blanket, throw away that Kleenex, put away that toy, hang up that shirt, etc. Nothing huge, just a quick walk through.)


This is what most of the rooms in my house look like after this simple routine. No dishes, no clothes, beds made, and I love to look around and say, "AHHHH". I try to have this routine done by about 9:30 each morning or the day just runs away from me. This seriously takes me maybe 45 minutes...not much at all. So give even just one of these things a try and let me know how it goes!

What's your daily routine? Share below!

Also, look forward to Monday's post for our "Ask Sarah" section. I'll take a couple questions that you posted over the weekend and answer them! This next Monday will include some organization tips! See you Monday!

Happy Weekend!

Sarah

Thursday, February 21, 2013

Coming Clean

I LOVE a clean and organized house. And I mean LOVE. I think I like it better than chocolate. I know, this is serious...or delusional. My love for clean even extends beyond my house. It spills over into my garage (although it would suggest otherwise right now), my car, my purse, my yard...you get the idea.

As I sit here and write this, my kids are watching an episode of Full House and I can't help but gawk over Danny Tanner. I told my hubby that I think he'd be my TV husband if I got to pick. His character, as long-time fans know, is a clean freak. And although the family in one episode refers to him as a "physco with a dust mop", I lovingly refer to him as "MY HERO".

Everyone is good at something. And it seems these days that when you're good at something, you blog about it and hope that someone else wants to know about it.

For years, a common line I hear from friends and random strangers alike is, "Your house is always so clean". So I guess I'm good at keeping things clean...a regular "Danny Tanner", if you will. It's not a very glamorous talent, by any means. A little sad even, depending on who you ask. But it keeps me happy. They also always assume that I must do nothing with my time but clean. I assure you this is not true. I have several other hobbies and loves. A clean house is just a lifestyle for me; something I've always done. And if you keep up with something, it never takes much work. I feel like my life is calm when things are clean and organized. I feel like I have more time for the important things. Of course I know it can't be that way all the time. We've had our fair share of absolute chaos and play days where I encourage the mess. There has to be a balance, right? Who wants to be a "physco with a dust mop"?!

So here's to the start of something new, in hopes that my tips and tricks will inspire someone else. Feel free to ask questions and please leave your comments! I love feedback! I'll make a point to talk about lots of different things from daily routines, organization of all kinds, laundry, cooking, natural solutions to everyday cleaning, and so on. The list of possibilities is endless! Please feel free to give any suggestions for posts that you'd like to see!

Stop by anytime. I promise to try and be exciting and interesting! But please excuse me for now...I have to go fold some laundry before starting dinner!

Happy Cleaning 

Sarah