Showing posts with label Pinteresting Solutions. Show all posts

Tuesday, March 26, 2013

Pinteresting Solutions: Reviving your favorite shirt

I can't wait to tell you about today's Pinteresting Solution! This must be a week for laundry related posts because it's all I seem to be able to focus on right now...probably because that's all I've been doing for the last week. Vacation and laundry don't mix. There's loads of it to catch up on...no pun intended.

I read about this solution months ago and have wanted to try it ever since. But I've been a little nervous because it required taking a razor to one of my favorite shirts. But I'll tell you what...am I ever glad I mustered the courage! This one is a keeper! Here it goes:

PINTERESTING SOLUTION: USING A RAZOR TO REMOVE BALLS FROM A SHIRT

You know how some shirts tend to accumulate those tiny little lint balls all over? I have a yellow shirt that I LOVE. But it's one of those shirts that accumulates those tiny balls and it makes the shirt look run down and old.

So this tip suggested taking a razor and running it over the shirt. The shirt remains in tact while the razor pulls the small balls off. It leaves your shirt looking new again. So after mulling it over I finally decided to take the plunge.

And guess what?! PERFECTION! It did a wonderful job! But here's some tips that I suggest:

Here's my shirt before the experiment:
 
(Look at all that balled up lint. Sad!)


Now go find your husband's favorite razor (sorry, Honey! I guess you're never meant to have a sharp razor!). I suggest as new a blade as you can get and one that's preferably a four-blade razor.


Now determine the direction of the shirt's grain - which way are the threads running? This is the way that you're going to pull the razor. Don't go against the grain to reduce risk of holes or snagging. You can see in the picture below that the grain in my shirt is running the width of the shirt. I have the razor placed the way I'm going to pull it. You'll also notice to the right how the lint is starting to accumulate in the lower corner. Make sure to pull it off every so often and just tap off the razor over the trash can or sink. Don't get the razor wet...all that lint will become a wet sticky mess on the razor.


Pull the lint that's starting to build off as the razor pulls it to the side.


I found that I did this worked best on a flat surface, being very careful to not let the fabric fold or bunch. Go slowly. You can also do this while wearing it. Just be careful.
 
As you can see above - HUGE DIFFERENCE! I'M IN LOVE WITH THIS!
 
Try it at your own discretion and tell me what you think!
 
What's your favorite way to revive your favorite piece of clothing?
 
Happy Cleaning!
 
The Queen


Friday, March 1, 2013

A New Blog Header and Pinteresting Solutions

Happy Friday, y'all! First of all, I'd like to proudly introduce my brand new blog header! Thanks to a very talented friend of mine, Spring, over at Spring Time Treats, I'm the proud owner of this adorable piece of art that now represents this blog! Please take a moment to go visit her website that's full of adorable stick figures, free pintables, fun games, and craft ideas. You can also visit her Etsy Shop for custom order family portraits and greeting cards. Thanks, Spring, for making clean look cute!

Now onto today's segment where I take a cleaning tip I found on Pinterest and put it to the test!

Pinteresting Solution: CLEANING A WINDOW WITH A DRYER SHEET

I had to give this one a try because I can't stand a dirty window for too long. In my house I have a set of double doors that lead out to the backyard and it's a fingerprint magnet. And when the sun shines on it just right, I often find myself trying to find a window in all the fingerprint (if you know what I mean). So today I decided to pull out a dryer sheet to see if any magic would happen.

While it did a good job of removing the prints, it also left behind a slight film and some small fibers. Dryer sheets right out of the box are polyester sheets often soaked in a softening agent. You can feel the "tackiness" on your fingers. So I ended up having to clean the window again anyway, I have not however tried a used dryer sheet, which was also suggested. I'll have to try that one later. While the softening agent will have been released from the sheet because of the heat of the dryer, small fibers will still remain and I don't think it gets the window as clean as it could be.

Here's some of my favorite products for cleaning a window:

1. White vinegar: You'd be shocked! And the smell doesn't last long.

2. Rubbing Alcohol: They make this in a Wintergreen Fresh scent so that it's more pleasant to smell.

3. Green Works Window Cleaner by Clorox: 95% naturally derived and smells great!

4. Newspaper: Leaves no streaks and can be thrown in the recycle bin afterwards!

5. Coffee Filters: Same as newspaper, only comes with the convenience of being bought in a nice, small package

6. Microfiber towels: Picks up dirt in amazing ways and can be washed again and again

But let's not throw the dryer sheet out onto the streets. Here are some of my favorite uses for the dryer sheet:

1. Sock/underwaer drawer refresher: Just put one of those babies in the bottom of your drawer and your socks will be doing a happy dance from smelling so fresh all the time!

2.  Car freshener: Put one under the driver and passenger seat in a small open Ziploc bag. Your car will smell wonderful. The reason for the Ziploc bag is to protect the carpet of your car on hot days. The heat will release the softening agents with the possibility of leaving a film on that single spot of your carpet. And although you may never see it, you might care someday!

3. Trash freshner: Next time you change the garbage, throw a dryer sheet in the bottom of the can before puting the bag back in.

4. Smelly Shoe Freshener: Take those bad boys off and throw a dryer sheet in each shoe. Let them sit overnight is a warm place and "Voila!". Much better!

5. Closet: Put one in your closet to keep clothes from smelling musty.

What are some of your favorite uses for a dryer sheet? How do you like to clean a window? Let me know!

So try one of these ideas this weekend and don't forget to post questions for Monday's post, "Ask Sarah".

Happy Cleaning!

Sarah

Friday, February 22, 2013

Pintersting Solutions and the Daily Routine

I'm a self proclaimed Pinterest addict. I heard someone a while ago refer to it as "digital hoarding". I'd say that's pretty much true...and I don't care. Pinterest is such a wealth of knowledge and fun ideas! And when it comes to cleaning and organization, Pinterest is literally PLASTERED with an idea or solution for everything.

As you Pinterest fans know, some things work and some things don't. Plain and simple. So every Friday here on "Queen of Tidy", I will pick a cleaning or organization tip that I saw and put it to the test. Then comes the review. Feel free to leave your own experiences in the comment section and let us know how your "Pinteresting Solutions" are coming!

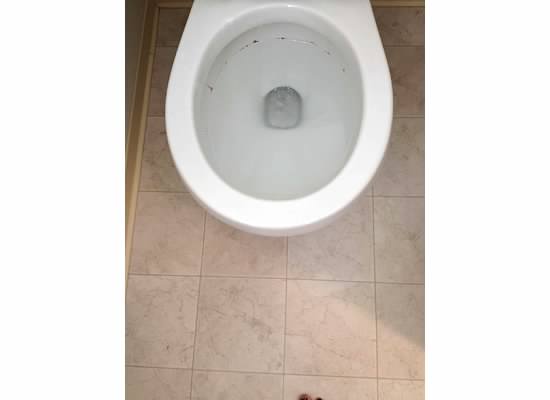
TODAY'S TEST: CLEANING A TOILET WITH VINEGAR AND BAKING SODA

The post suggests using 2 cups of vinegar poured into the bowl of the toilet, followed by sprinkling 2 TBSP of baking soda on top. Then let it sit and watch your stains disappear.

We'll see...

Here's my toilet before:

Here's the volcanic science project in progress:


Here's 15 minutes later:


Well, I didn't see my stains magically disappear. That said, I don't consider this experiment a failure. I'm a huge fan of vinegar and baking soda. They're both powerful cleaning products that are natural and safe for the environment and my little ones. I pulled out the toilet brush and cleaned as normal. I'll tell you what, though...the stains and germs didn't even put up a fight! The vinegar and baking soda did a great job of loosening things up and my porcelain throne looks amazing. So go ahead and pull out the toilet brush and just swish all that natural magic around! Your toilet is as good as new and you already had what you needed hanging around in the kitchen. Your pocket book will thank you (vinegar and baking soda = dirt cheap) and Mother Nature will thank you too!

The second part to this post will get you familiar with how I work each day to keep this circus in motion.

I thrive on routine. It keeps me sane. And everyday I have a small list of things that I do to keep the house in semi-order. I promise if you pick just a couple to start implementing, that things will seem a little more orderly. This is done once in the morning and once at night. My mom always said: WAKE YOUR HOUSE UP EVERY MORNING and PUT IT TO BED EVERY NIGHT. I've found this to be true. Start and end the day with order. So here it goes:

1. Make the beds (This obviously doesn't need to be done at night)
2. Open all the blinds (Close them up at night)
3. Empty and load the dishwasher (No dishes in the sink..EVER. Clean up after each meal. Start it before bed so that you wake up to clean dishes)
4. Sweep the floor and quick vacuum if needed (I do this after each meal.)
5. Start and fold a load of laundry (This includes putting them away!)
6. Quick walk through of all rooms (Just tidy up a bit...fold that blanket, throw away that Kleenex, put away that toy, hang up that shirt, etc. Nothing huge, just a quick walk through.)


This is what most of the rooms in my house look like after this simple routine. No dishes, no clothes, beds made, and I love to look around and say, "AHHHH". I try to have this routine done by about 9:30 each morning or the day just runs away from me. This seriously takes me maybe 45 minutes...not much at all. So give even just one of these things a try and let me know how it goes!

What's your daily routine? Share below!

Also, look forward to Monday's post for our "Ask Sarah" section. I'll take a couple questions that you posted over the weekend and answer them! This next Monday will include some organization tips! See you Monday!

Happy Weekend!

Sarah